
Create a Kubernetes cluster on CentOS 7

Kubernetes is an open source system developed by Google which automates deployment, operations and scaling of containerized applications. It is a holistic solution for automated delivery offering a wide range of critical features like automatic binpacking, self-healing, auto-scaling, service registry, software load-balancing, automated rollouts, automated rollbacks, secret and configuration management, storage orchestration and batch execution.
It is hands down the best technology I have master recently.
In this article, I will help you setting up your cluster. It is going to take some effort but it’s all worth it.
Let’s get started.
**UPDATE 5th November 2016**
While I still exhort you to read this article for educational purposes, there is now a much easier way to setup a Kubernetes cluster using `kubeadm`. I will write an article on it as soon as possible. In the meantime you can follow the official documentation on [http://kubernetes.io/docs/getting-started-guides/kubeadm/](http://kubernetes.io/docs/getting-started-guides/kubeadm/)
Architecture Overview
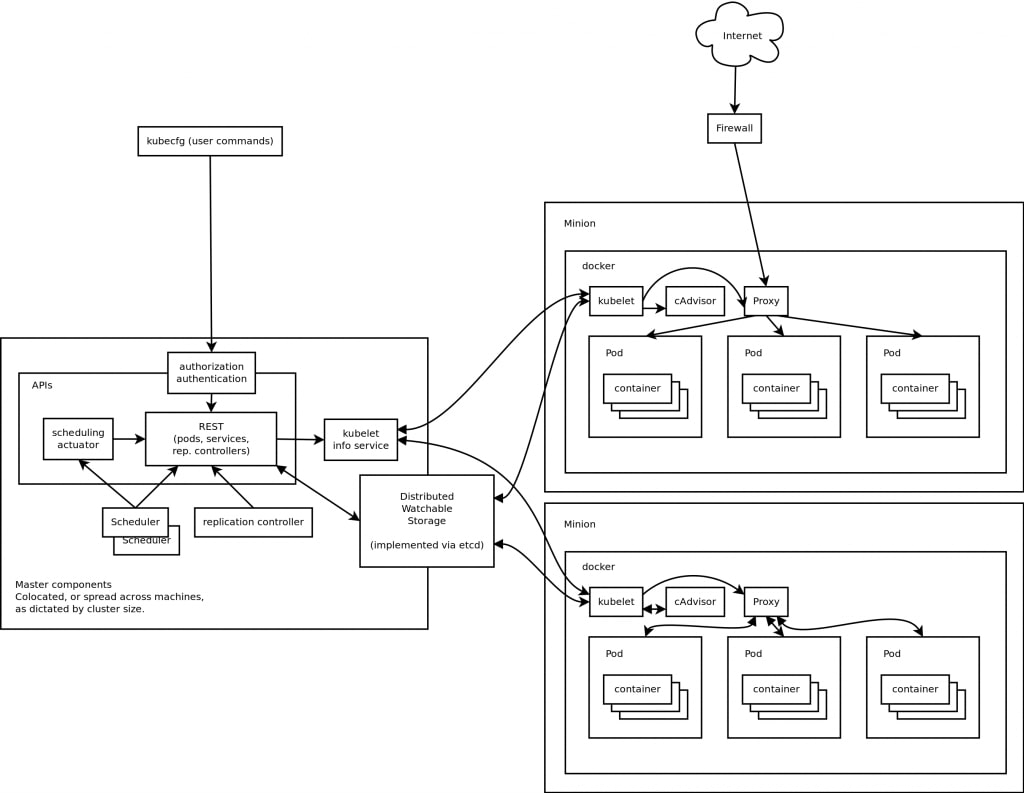
The high level architecture of Kubernetes is pretty simple. There is a master which controls one or more nodes where pods are spawned. The kube-apiserver, the kube-scheduler and the kube-controller-manager reside on the master, while the kubelet and the kube-proxy reside on the nodes. The kubectl, the command line interface, can be placed on any machine, even outside the cluster.
In few words, the master monitors the nodes and schedules pods on the nodes by invoking the `kubelet`. The `kube-proxy` enables software load-balancing and the services paradigm.
Data is persisted on etcd, a key-value store accessible through a RESTful API. Networking can be implemented in many different ways as long as it satisfies the Kubernetes requirements. For the scope of this tutorial, we will be using flannel.
This is obviously a very simplistic description. If you wish to dig deeper, just read the official documentation on http://kubernetes.io
Pre-requisites
In order to setup a cluster you need a minimum of 1 VM, i.e. you can run the master and one node on the same machine. In this tutorial I will assume you have at least 2 VMs. However you should be able to follow the same step sequence in both cases.
Setup the master
Disable firewalld
Disable iptables to avoid conflicts with Docker.
systemctl stop firewalld
systemctl disable firewalld
Install ntp
Install the Network Time Protocol to keep the nodes in synch.
yum install ntp
systemctl start ntpd
systemctl enable ntpd
systemctl status ntpd
Install etcd
Install etcd.
yum install etcdBefore launching and enabling the etcd service you need to define its configuration in `/etc/etcd/etcd.conf`. The file contains several lines. You need to make sure the following are uncommented and setted as shown below.
ETCD_NAME=default
ETCD_DATA_DIR="/var/lib/etcd/default.etcd"
ETCD_LISTEN_CLIENT_URLS="http://0.0.0.0:2379"
ETCD_ADVERTISE_CLIENT_URLS="http://localhost:2379"
Finally launch and enable the service.
systemctl start etcd
systemctl enable etcd
systemctl status etcd
Install the Kubernetes components
You can install the Kubernetes components in several ways. The simplesy is to use yum`. If you wish to install the latest version or a particular release you need refer to the kubernetes repository itself since it is a bit more complicate. I plan to right a separate post to show you how to do that. For the time being, let’s stick to the simpler approach.
First we install Kubernetes through yum.
yum install kubernetesBefore starting the services we need to take care of the configuration. Once again make sure the following lines are uncommented and set as shown below.
KUBE_API_ADDRESS="--address=0.0.0.0"
KUBE_API_PORT="--port=8080"
KUBELET_PORT="--kubelet_port=10250"
KUBE_ETCD_SERVERS="--etcd_servers=http://127.0.0.1:2379"
KUBE_SERVICE_ADDRESSES="--service-cluster-ip-range=10.254.0.0/16"
Now we can finally start the kube-apiserver, kube-controller-manager and kube-scheduler.
for SERVICES in kube-apiserver kube-controller-manager kube-scheduler; do
systemctl start $SERVICES
systemctl enable $SERVICES
systemctl status $SERVICES
done
Configure the Flannel network
Before moving away from the master we will create a configuration key in `etcd` defining the flannel network which will be used by the nodes.
etcdctl mk /flannel/network/config '{"Network":"172.17.0.0/16"}'Setup the node
Disable firewalld
Disable iptables to avoid conflicts with Docker.
systemctl stop firewalld
systemctl disable firewalld
Install ntp
Install the Network Time Protocol to keep the nodes in synch.
yum install ntp
systemctl start ntpd
systemctl enable ntpd
systemctl status ntpd
Install Docker
Install docker. We will start its service later on.
yum install dockerInstall Flannel
Install flannel with yum
yum install flannelBefore starting it you need to edit its configuration in /etc/sysconfig/flanneld. Make sure the following fields are defined.
# Replace `$ETCD_MASTER` with the IP of the master VM.
FLANNEL_ETCD="http://$ETCD_MASTER:2379"
FLANNEL_ETCD_KEY="/flannel/network"
We will start the service later on as well.
Install the Kubernetes components
As for the master, we will use yum.
yum install kubernetesWe configure the KUBE_MASTER address in /etc/kubernetes/config.
# Replace `$KUBE_MASTER` with the IP of your master VM.
KUBE_MASTER="--master=http://$KUBE_MASTER:8080"
We configure the kubelet in /etc/kubernetes/kubelet. Make sure to have the following fields uncommented.
KUBELET_ADDRESS="--address=0.0.0.0"
KUBELET_PORT="--port=10250"
# Replace $NODE_IP with the IP address of this node
KUBELET_HOSTNAME="--hostname_override=$NODE_IP"
# Replace `$KUBE_MASTER` with the IP of the master VM.
KUBELET_API_SERVER="--api_servers=http://$KUBE_MASTER:8080"
KUBELET_ARGS=""
Finally let’s start all services.
for SERVICES in kube-proxy kubelet docker flanneld; do
systemctl start $SERVICES
systemctl enable $SERVICES
systemctl status $SERVICES
done
Testing the installation while setting up SkyDNS
Check Node(s) state
If the installation went fine, we should be able to see all the nodes we configured as `Ready` from the master.
kubectl get nodes

# Expected output
NAME STATUS AGE
192.168.10.10 Ready 9m
192.168.10.11 Ready 5m
192.168.10.12 Ready 1m
Install Kube-DNS
Kubernetes offers a DNS cluster addon, which assigns DNS names to Services. This is extremely useful because it allows you to develop your application without hardcoding IPs.
Create a file named skydns-svc.yml with the following content.
apiVersion: v1
kind: Service
metadata:
  name: kube-dns
  namespace: kube-system
  labels:
    k8s-app: kube-dns
    kubernetes.io/cluster-service: "true"
    kubernetes.io/name: "KubeDNS"
spec:
  selector:
    k8s-app: kube-dns
  clusterIP:  10.254.254.254
  ports:
  - name: dns
    port: 53
    protocol: UDP
  - name: dns-tcp
    port: 53
    protocol: TCP
Now create the Service.
kubectl create -f skydns-svc.yml
kubectl get svc --all-namespaces

# Expected output
NAMESPACE NAME CLUSTER-IP EXTERNAL-IP PORT(S) AGE
default kubernetes 10.254.0.1 443/TCP 13m
kube-system kube-dns 10.254.254.254 53/UDP,53/TCP 8m
Create a file name skydns-rc.yml with the following content.
apiVersion: v1
kind: ReplicationController
metadata:
  name: kube-dns-v11
  namespace: kube-system
  labels:
    k8s-app: kube-dns
    version: v11
    kubernetes.io/cluster-service: "true"
spec:
  replicas: 1
  selector:
    k8s-app: kube-dns
    version: v11
  template:
    metadata:
      labels:
        k8s-app: kube-dns
        version: v11
        kubernetes.io/cluster-service: "true"
    spec:
      containers:
      - name: etcd
        image: gcr.io/google_containers/etcd-amd64:2.2.1
        resources:
          limits:
            cpu: 100m
            memory: 500Mi
          requests:
            cpu: 100m
            memory: 50Mi
        command:
        - /usr/local/bin/etcd
        - -data-dir
        - /var/etcd/data
        - -listen-client-urls
        - http://127.0.0.1:2379,http://127.0.0.1:4001
        - -advertise-client-urls
        - http://127.0.0.1:2379,http://127.0.0.1:4001
        - -initial-cluster-token
        - skydns-etcd
        #volumeMounts:
        #- name: etcd-storage
        #  mountPath: /var/etcd/data
      - name: kube2sky
        image: gcr.io/google_containers/kube2sky:1.14
        command:
        - /kube2sky
        - --domain=cluster.local
        - --kube-master-url=http://192.168.0.20:8080
        resources:
          limits:
            cpu: 100m
            memory: 200Mi
          requests:
            cpu: 100m
            memory: 50Mi
        livenessProbe:
          httpGet:
            path: /healthz
            port: 8080
            scheme: HTTP
          initialDelaySeconds: 60
          timeoutSeconds: 5
          successThreshold: 1
          failureThreshold: 5
        readinessProbe:
          httpGet:
            path: /readiness
            port: 8080
            scheme: HTTP
          initialDelaySeconds: 30
          timeoutSeconds: 5
        args:
        - --domain=cluster.local
      - name: skydns
        image: gcr.io/google_containers/skydns:2015-10-13-8c72f8c
        resources:
          limits:
            cpu: 100m
            memory: 200Mi
          requests:
            cpu: 100m
            memory: 50Mi
        args:
        - -machines=http://127.0.0.1:4001
        - -addr=0.0.0.0:53
        - -ns-rotate=false
        - -domain=cluster.local.
        ports:
        - containerPort: 53
          name: dns
          protocol: UDP
        - containerPort: 53
          name: dns-tcp
          protocol: TCP
      - name: healthz
        image: gcr.io/google_containers/exechealthz:1.0
        resources:
          limits:
            cpu: 10m
            memory: 20Mi
          requests:
            cpu: 10m
            memory: 20Mi
        args:
        - -cmd=nslookup kubernetes.default.svc.cluster.local 127.0.0.1 >/dev/null
        - -port=8080
        ports:
        - containerPort: 8080
          protocol: TCP
      #volumes:
      #- name: etcd-storage
      #  emptyDir: {}
      dnsPolicy: Default
Create the replication controller.
kubectl create -f skydns-rc.yml
kubectl get pods --all-namespaces

# Expected output
NAME READY STATUS RESTARTS AGE
kube-dns-v11-tasos 4/4 Running 1 3m
Finally we need to instruct all kubelet instances (on each node) to make use of the DNS server. Just set the following arguments in the /etc/kubernetes/kubelet.
KUBELET_ARGS="--cluster-dns=10.254.254.254 --cluster-domain=cluster.local"Restart the kubelet on all nodes.
systemctl restart kubeletTest the DNS server
Create a file busybox.yaml with the following content.
apiVersion: v1
kind: Pod
metadata:
  name: busybox
  namespace: default
spec:
  containers:
  - image: busybox
    command:
      - sleep
      - "3600"
    imagePullPolicy: IfNotPresent
    name: busybox
  restartPolicy: Always
Create the pod.
kubectl create -f busybox.yamlWait for the pod to be Running.
kubectl get pods

# Expected output
NAME READY STATUS RESTARTS AGE
busybox 1/1 Running 0 58s
Connect to the pod and perform an nslookup on the kubernetes service.
kubectl exec -ti busybox sh
/ # nslookup kubernetes
Server: 10.254.254.254
Address 1: 10.254.254.254

Name: kubernetes
Address 1: 10.254.0.1
Success
Ta-Dah!

Now time for you to explore the power of Kubernetes and Accellerate Your Delivery!