
How to backup Microk8s clusters with Velero in 2026

If you’re looking for a reliable way to backup Microk8s clusters with Velero, you have found the solution to your problems. In this tutorial, I’ll guide you through the necessary steps to successfully backup everything, including volumes.
But first a quick introduction on Microk8s and Velero. Just skip the following section if you are in a rush. 🏃♂️➡️
Why Microk8s and Velero
I deployed and managed all kinds of Kubernetes clusters, including those with sophisticated distributed storage like Ceph or Longhorn. However, they are definitely overkill for a homelab setup hosting a handful of blogs and apps. This is why I prefer microk8s for these “light-to-medium” environments. It is not only simple to install and upgrade, but also incredibly stable and lightweight, making the perfect foundation for personal projects.
This very blog and its database are hosted on microk8s and backing them up is imperative. Unfortunately, even the best engineer can have a bad day 😝 and when it’ll happen to you, you’ll bless the time you invested in setting up proper backup.
But why Velero? 🤔
Velero is a complete solution for Kubernetes resource and persistent volume backup. It’s essential for disaster recovery and provides a powerful data migration strategy that makes your clusters portable. This means you can easily migrate Kubernetes resources and application state from one cluster to another.
In practice, Velero allows you to back up any kind of application or database without the need to configure complex, ad-hoc operators or custom jobs for each service. This simple, unified approach is key to reliable recovery.
Architecture and pre-requisites
Velero consists of an application that runs in your cluster and backs up resources and volumes to supported storage providers.
sequenceDiagram
    participant User as User (CLI)
    participant K8sAPI as K8s API Server
    participant VC as Velero Controller
    participant NA as Node Agent (Restic/Kopia)
    participant Store as Object Storage (MinIO/S3/etc)

    User->>K8sAPI: velero backup create my-backup-name
    K8sAPI->>VC: Create Backup CR

    rect rgb(240, 240, 240)
    Note over VC: Metadata Phase
    VC->>K8sAPI: Query YAML (Deployments, Services, etc.)
    VC->>Store: Upload Metadata (.tar.gz)
    end

    rect rgb(220, 235, 255)
    Note over NA: File-System Backup (Local Volumes)
    VC->>K8sAPI: Create PodVolumeBackup CR
    K8sAPI->>NA: Trigger Data Upload
    NA->>NA: Access Local Volume (HostPath/Local)
    NA->>Store: Push File-level Data (Chunks/Blobs)
    NA-->>VC: File Backup Complete
    end

    VC->>K8sAPI: Update Backup CR Status (Completed)
In this tutorial, I will use Cloudflare R2, an AWS S3-compatible object storage solution with a generous free tier of 10 GB-month / month. You can use any other S3-compatible provider.
Just do the following:
- Create a dedicated bucket for the backups. I named mine
velero. - Generate and save the credentials (Access Key ID and Secret Access Key) with read/write permissions somewhere safe. We will use them later.
- Also take also note of the endpoint URL (e.g.
https://<your_account_id>.r2.cloudflarestorage.com)
Installing Velero
Downloading the CLI
At the time of writing the Velero CLI is not distributed as a package on Linux, so we will download the executable compatible with our OS on our development machine (⚠️ not the target cluster ⚠️) and move it into the $PATH.
curl -LO https://github.com/vmware-tanzu/velero/releases/download/v1.17.1/velero-v1.17.1-linux-amd64.tar.gz
tar xvf velero-v1.17.1-linux-amd64.tar.gz
cd velero-v1.17.1-linux-amd64/
sudo mv velero /usr/local/bin/
echo 'source <(velero completion bash)' >>~/.bashrc
Configuring the credentials file
Velero expects the credentials to be stored in a file. Let’s create a directory and place the credentials in there. Replace YOUR_ACCESS_KEY_ID and YOUR_SECRET_ACCESS_KEY with the S3-Compatible provider credentials we generated earlier before executing the following commands.
mkdir velero
cd velero/
cat <<EOF > credentials-velero
[default]
aws_access_key_id=YOUR_ACCESS_KEY_ID
aws_secret_access_key=YOUR_SECRET_ACCESS_KEY
EOF
Installing the Velero Server
Next is the installation of the Velero server on microk8s. Remember to replace your S3_ENDPOINT_URL with the URL we saved earlier.
velero install \
    --provider aws \
    --plugins velero/velero-plugin-for-aws:v1.13.0 \
    --bucket velero-k8s-pve2 \
    --backup-location-config region=auto,s3Url=S3_ENDPOINT_URL \
    --secret-file ./credentials-velero \
    --use-node-agent \
    --privileged-node-agent \
    --kubelet-root-dir /var/snap/microk8s/common/var/lib/kubelet \
    --use-volume-snapshots=false
Before we proceed, let me highlight some important aspects of this configuration.
Snapshots are possible only if you are using a block or file storage system that complies with the CSI specification. Since this tutorial is based on a single-node cluster using a storage provider like openebs-hostpath (which lacks CSI support), I have disabled this option.
For the very same reason, I enabled the node-agent which is going to do a backup by accessing the file system. Note that this is not ideal for production systems but it is perfectly fine for a homelab environment. I’ll give more details later.
Finally, I am defining the kubelet location, because microk8s, when installed as a snap, often places it in a non-canonical directory.
Now, before you proceed further make sure the velero and node-agent pods are up and running.
$ kubectl -n velero get pods
NAME                                                           READY   STATUS      RESTARTS   AGE
node-agent-ccg27                                               1/1     Running     0          2m
velero-6d68d8b798-glphd                                        1/1     Running     0          2m
Creating the sample application and volume
We will create a sample namespace and a nginx pod with a persistent volume attached. You need to have a supported default storage class already configured. For a single node cluster, I suggest you use the openebs-hostpath addon. For a multi-node cluster with at least three nodes, you could opt for openebs-jiva-default or mayastor.
Note that Velero does not support hostpath-storage despite a Canonical article from 2022 says otherwise (at least it did not work for me 😝). However, if you already have deployments using this hostpath-storage, don’t worry and keep following along. I will explain how to migrate such volumes to a supported storage class later.
Creating the namespace and setting the context
kubectl create namespace nginx-velero-tutorial
kubectl config set-context --current --namespace nginx-velero-tutorial
Creating the PVC
cat <<EOF | kubectl apply -f -
apiVersion: v1
kind: PersistentVolumeClaim
metadata:
  name: nginx-pvc
  namespace: nginx-velero-tutorial
spec:
  storageClassName: openebs-hostpath # change this if using something else
  accessModes:
    - ReadWriteOnce
  resources:
    requests:
      storage: 1Gi
EOF
Creating the Pod
cat <<EOF | kubectl apply -f -
apiVersion: v1
kind: Pod
metadata:
  name: nginx
  namespace: nginx-velero-tutorial
spec:
  containers:
    - name: nginx
      image: nginx
      volumeMounts:
        - mountPath: "/usr/share/nginx/html"
          name: html-volume
  volumes:
    - name: html-volume
      persistentVolumeClaim:
        claimName: nginx-pvc
EOF
Verifying the Pod’s state
Let’s check that the pod is in Running state and let’s customize its index.html file just for fun 😂
$ kubectl get pods
NAME    READY   STATUS    RESTARTS   AGE
nginx   1/1     Running   0          9s
$ kubectl exec nginx -- sh -c 'echo "<h1>Velero is cool</h1>" > /usr/share/nginx/html/index.html'
$ kubectl exec nginx -- curl -s localhost
<h1>Velero is cool</h1>
Creating a Backup
Finally, we are getting to the crux of this tutorial and we are ready to create our first backup. We will instruct velero to backup our entire namespace, i.e. Kubernetes resources and volumes.
$ velero create backup nginx-backup --include-namespaces nginx-velero-tutorial --default-volumes-to-fs-backup
Backup request "nginx-backup" submitted successfully.
We will then check the state through CLI and double check that the files were actually uploaded to the destination bucket.
$ velero backup describe nginx-backup
Name: nginx-backup
Namespace: velero
Labels: velero.io/storage-location=default
Annotations: velero.io/resource-timeout=10m0s
velero.io/source-cluster-k8s-gitversion=v1.32.9
velero.io/source-cluster-k8s-major-version=1
velero.io/source-cluster-k8s-minor-version=32
Phase: Completed
Namespaces:
Included: nginx-velero-tutorial
Excluded: <none>
Resources:
Included cluster-scoped: <none>
Excluded cluster-scoped: volumesnapshotcontents.snapshot.storage.k8s.io
Included namespace-scoped: *
Excluded namespace-scoped: volumesnapshots.snapshot.storage.k8s.io
Label selector: <none>
Or label selector: <none>
Storage Location: default
Velero-Native Snapshot PVs: auto
File System Backup (Default): true
Snapshot Move Data: false
Data Mover: velero
TTL: 720h0m0s
CSISnapshotTimeout: 10m0s
ItemOperationTimeout: 4h0m0s
Hooks: <none>
Backup Format Version: 1.1.0
Started: 2026-01-11 17:40:26 +0100 CET
Completed: 2026-01-11 17:40:43 +0100 CET
Expiration: 2026-02-10 17:40:26 +0100 CET
Total items to be backed up: 6
Items backed up: 6
Backup Volumes:
Velero-Native Snapshots: <none included>
CSI Snapshots: <none included>
Pod Volume Backups - kopia (specify --details for more information):
Completed: 1
HooksAttempted: 0
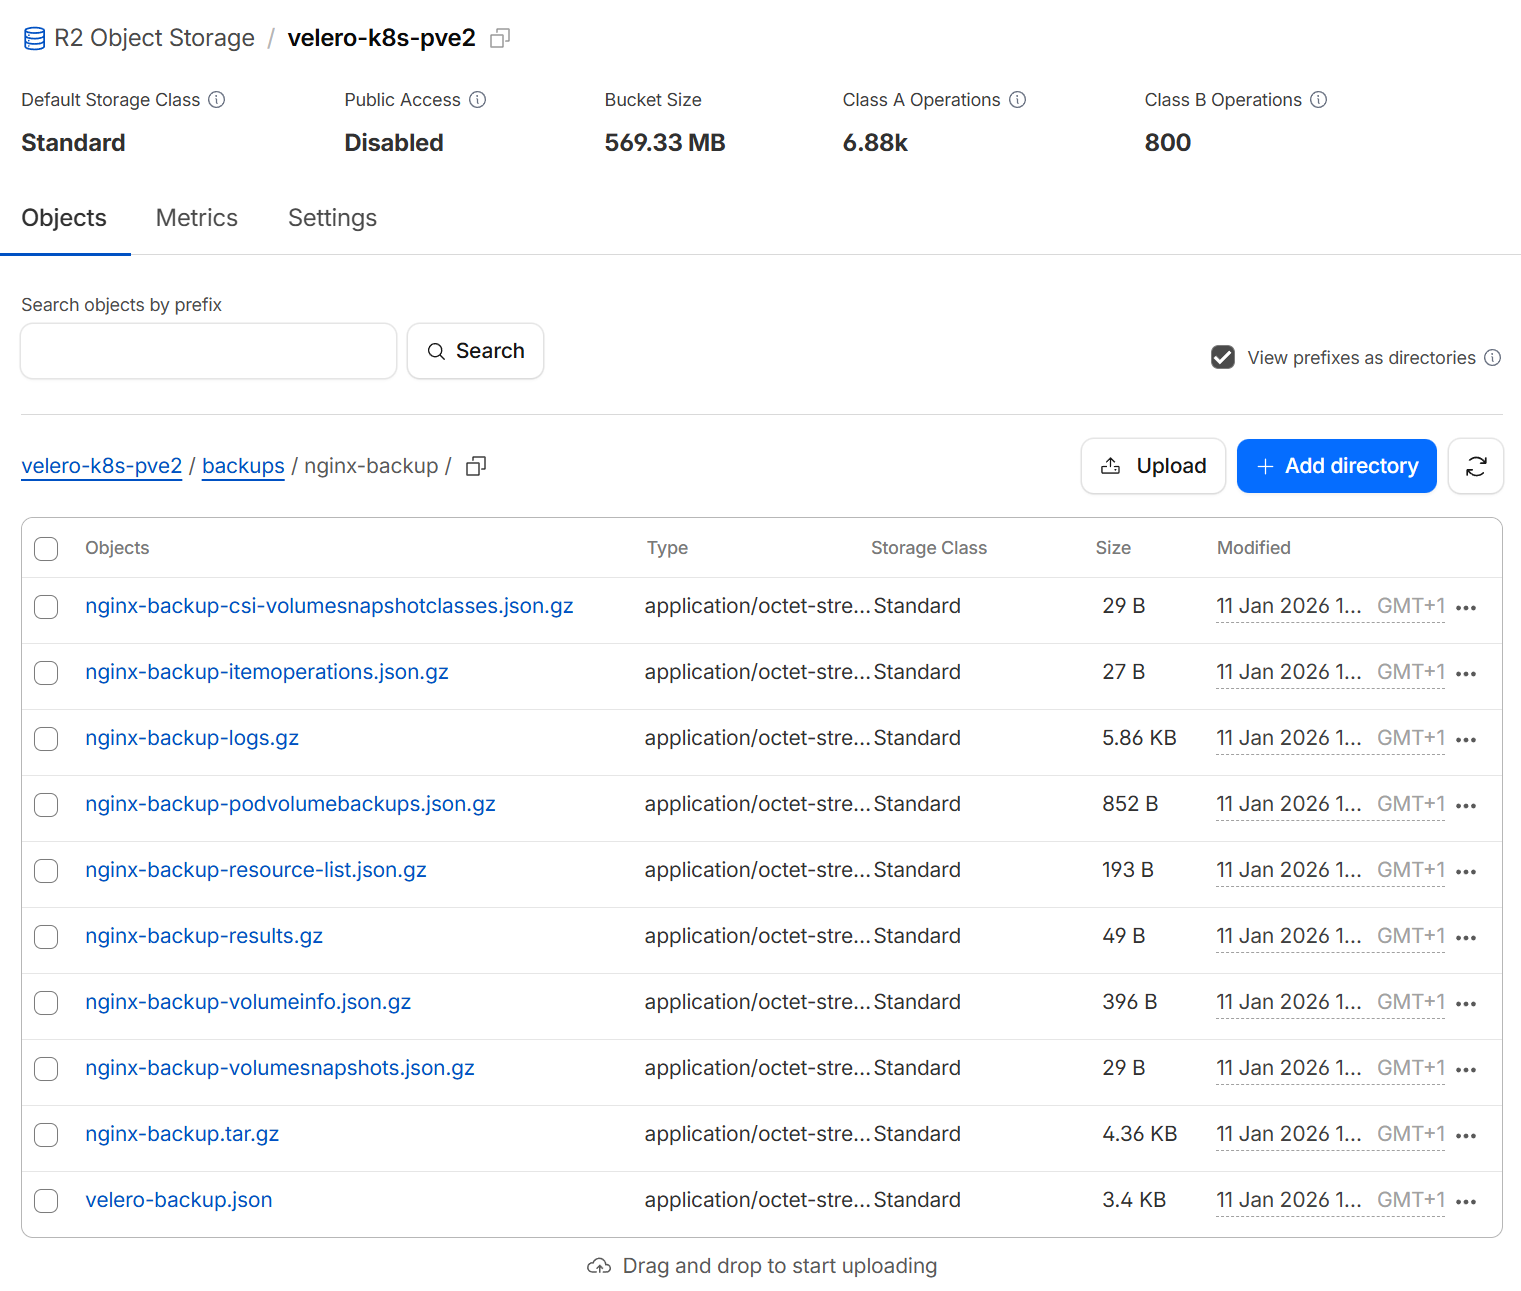
HooksFailed: 0And by accessing my Cloudflare R2 Dashboard I can see the files were uploaded and are clearly named.
Disaster Recovery Test
Having a backup is only half the battle. As the saying goes, a backup that hasn't been restored is not a backup at all! 😂
Now, to truly prove the robustness of our setup, we’re going to re-enact a small-scale disaster: we will completely delete the nginx-velero-tutorial namespace with its application and data. Don't panic! 😉 We’ll then walk through the steps to use Velero to reconstruct everything exactly as it was, proving that our investment in a proper backup strategy was well worth it. Let's nuke it and bring it back! 💥
Deleting the Namespace
Boom!
$ kubectl delete namespaces nginx-velero-tutorial
namespace "nginx-velero-tutorial" deleted
Pause Backups
We need to pause backups during the restore process by setting the backup-storage-location in ReadOnly mode.
$ kubectl -n velero patch backupstoragelocations.velero.io default \
 --type merge \
 --patch '{"spec":{"accessMode":"ReadOnly"}}'
backupstoragelocation.velero.io/default patched

$ velero backup-location get
NAME      PROVIDER   BUCKET/PREFIX     PHASE       LAST VALIDATED                  ACCESS MODE   DEFAULT
default   aws        velero            Available   2026-01-11 15:30:29 +0100 CET   ReadOnly      true
Restore
We are now ready to restore the namespace.
$ velero restore create --from-backup nginx-backup
Restore request "nginx-backup-20260114152141" submitted successfully.
Run `velero restore describe nginx-backup-20260114152141` or `velero restore logs nginx-backup-20260114152141` for more details.

# Let's verify that the namespace was created and the pod is running
$ kubectl -n nginx-velero-tutorial get pods
NAME    READY   STATUS    RESTARTS   AGE
nginx   1/1     Running   0          36s

# Let's also verify that the volume with our custom index.html was mounted
$ k exec nginx -- curl -s localhost
<h1>Velero is cool</h1>
Success! 🥳
Resume Backups
Let's not forget to revert the backup-storage-location back to ReadWrite access mode.
$ kubectl -n velero patch backupstoragelocations.velero.io default \
 --type merge \
 --patch '{"spec":{"accessMode":"ReadWrite"}}'
backupstoragelocation.velero.io/default patched

$ velero backup-location get
NAME      PROVIDER   BUCKET/PREFIX     PHASE       LAST VALIDATED                  ACCESS MODE   DEFAULT
default   aws        velero            Available   2026-01-11 15:41:19 +0100 CET   ReadWrite      true
Next Steps
Now that you have Velero configured on your machine, I suggest you create a scheduled backup for every important deployment you have in your system such as databases or web servers content folders.
In order to avoid flooding your object storage bucket and receiving a large bill, make sure to configure a sensible schedule and Time To Live (TTL) for the backup. The following will backup our sample namespace once a day, and discard the backups after 3 days. Since the schedule runs daily, this effectively means we will keep the last three successful backups at any given time.
velero schedule create daily-nginx-backup \
  --schedule="0 1 * * *" \
  --include-namespaces nginx-velero-tutorial \  --default-volumes-to-fs-backup \
  --ttl 72h0m0s
Migrating from hostpath-storage to a supported storage provider
As I previously mentioned, Velero won’t backup your volumes if they were provisioned using the hostpath-storage storage class. You can still create a backup for a namespace with such volumes, but Velero will simply skip the volumes and show a clear warning in the backup details
$ velero backup describe your-backup-name

[...]

Warnings:
  Velero:     <none>
  Cluster:    <none>
  Namespaces:
    mysql:   resource: /pods name: /mysql-7df8bdb5f7-4zv5q message: /Volume mysql in pod mysql/mysql-7df8bdb5f7-4zv5q is a hostPath volume which is not supported for pod volume backup, skipping

[...]
So what do we do in such a scenario?
The process is simple but tedious. You will need to perform these steps:
- Enable a supported storage provider like openebs-hostpath, openebs-jiva-default or mayastor, if you haven’t already.
- Create a new Persistent Volume Claim (PVC) using the new supported storage class.
- Stop the application completely to ensure a consistent data copy. You can scale the deployment to 0, or delete it temporarily.
- Create a temporary pod that mounts both the old hostPath volume and the new PVC.
- Copy the data manually from the old mount point to the new mount point within the temporary pod.
- Modify and recreate your deployment or pod definition to mount only the new PVC at the application's original target location.
- Restart the application (e.g., scale the deployment back up).
I will not share the specific commands because they won’t apply exactly to your scenario. However, if you have trouble feel free to write me a comment below and I will be more than happy to help.
Conclusion
We did it!
We successfully configured Velero and implemented a robust file system-level backup strategy for our MicroK8s clusters, ensuring that our Kubernetes resources and persistent volumes are safe using an S3-compatible service like Cloudflare R2.
By following this tutorial, we’ve not only learned how to perform a critical one-time backup but also how to schedule future backups, ensuring that data loss scenarios, like the one I experienced in 2019 🫣, will never happen again.
Stay tuned for a future post where I'll demonstrate the migration of these resources and volumes between clusters. Be sure to subscribe to the newsletter for exclusive insights, news summaries, and updates on my latest blog activity.