
Kubernetes Free TLS Certificate Management

How to Create and Manage TLS Certificates for Free on a Kubernetes cluster with Nginx and cert-manager.
Using HTTPS to publish your website or expose your API is a must nowadays. Luckily, long gone are the days where you needed to spend hundreds of dollars and time to create and manage a valid TLS / SSL certificate. In this tutorial, I will explain how to fully automate the process of requesting and configuring your certificates in a Kubernetes cluster using cert-manager, Let’s Encrypt and the Nginx Ingress Controller.
While the installation and configuration of cert-manager is extremely trivial, I would classify this tutorial as advanced because of its prerequisites. I actually started writing this post in November 2019 but never published because it was too long and complicated, so I decided to skip the prerequisites setup. If you are looking for this solution, my expectation is that you already have a working Kubernetes cluster with some of your applications exposed to the public internet. If you don’t, I would advice you to read the following tutorials first:
- Easiest Kubernetes Install ever! Certified Kubernetes with just one command line
- Install Nginx Ingress Controller on Kubernetes and MicroK8s
Create the DNS record
Before we proceed with the installation of cert-manager, it is best to create the DNS record so we give it chance to propagate over the internet. You need to point the record to the public IP of your exposed Kubernetes Ingress Controller. Feel free to comment below if you have a hard time understanding how to do this.
Pro Tip: Avoid hitting your domain name before creating the record to avoid negative caching.
Installing cert-manager
To install cert-manager, just execute the following:
kubectl create namespace cert-manager
kubectl apply --validate=false -f https://github.com/jetstack/cert-manager/releases/download/v1.0.3/cert-manager.yaml
We verify if the relevant Pods are running.
marcol@ubuntu:~$ kubectl get pods -n cert-manager
 NAME                                       READY   STATUS    RESTARTS   AGE
 cert-manager-5c47f46f57-jpv29              1/1     Running   0          4m
 cert-manager-cainjector-6659d6844d-wn4nj   1/1     Running   1          4m
 cert-manager-webhook-547567b88f-xtnwx      1/1     Running   0          4m
Integrating Let’s Encrypt
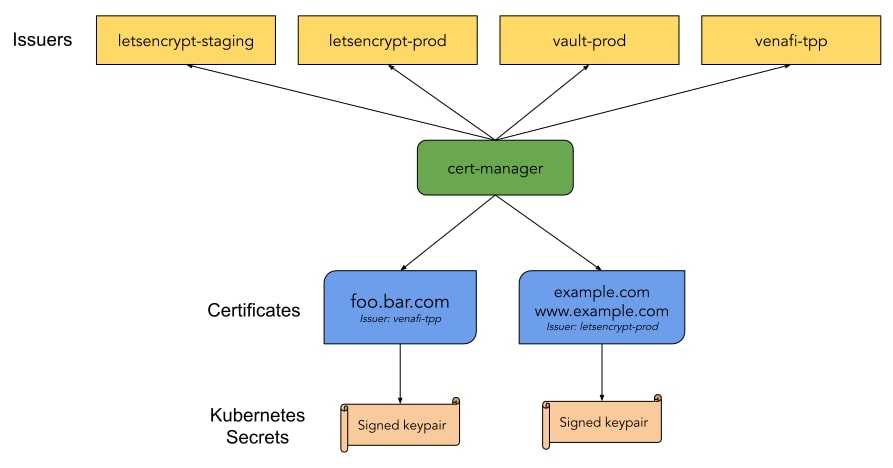
A compelling thing about cert-manager is its support for multiple types of certificate issuers: SelfSigned, CA, Vault, Venafi, External and ACME. Multiple issuers can be configured per cluster and each Ingress defines which issuer it wants to use for the management of its certificates.
Let’s Encrypt is a nonprofit Certificate Authority that provides free TLS certificates to over 200 million websites already. It provides certificates through an automated system that falls under the Automated Certificate Management Environments (ACME) category.
Pro Tip: Let’s Encrypt has strict rate limits! Always test your configurations against the staging Issuer. Use the production Issuer only when you are 100% confident everything is configured correctly.
Create a Deployment
You will most probably have already a deployment in mind for which you want to automate TLS management. If you do not, let’s just use the sample deployment and service offered by cert-manager named kuard.
kubectl apply -f https://netlify.cert-manager.io/docs/tutorials/acme/example/deployment.yaml
kubectl apply -f https://netlify.cert-manager.io/docs/tutorials/acme/example/service.yaml
Configure Let’s Encrypt Issuer
Let’s setup two Issuer resources: one for staging and the other for production. An Issuer is a special Kubernetes resource that represents a CA able to generate signed certificates by honoring certificate signing requests. Type the following command to be able to edit the definition before applying it to your cluster.
kubectl create --edit -f https://cert-manager.io/docs/tutorials/acme/example/staging-issuer.yamlEdit the YAML by replacing the email address with the one you want to use during certificate registration.
apiVersion: cert-manager.io/v1
   kind: Issuer
   metadata:
     name: letsencrypt-staging
   spec:
     acme:
       # The ACME server URL
       server: https://acme-staging-v02.api.letsencrypt.org/directory
       # Email address used for ACME registration
       email: [email protected]
       # Name of a secret used to store the ACME account private key
       privateKeySecretRef:
         name: letsencrypt-staging
       # Enable the HTTP-01 challenge provider
       solvers:
       - http01:
           ingress:
             class:  nginx
Let’s repeat the same procedure for the production Issuer as well.
kubectl create --edit -f https://cert-manager.io/docs/tutorials/acme/example/production-issuer.yaml apiVersion: cert-manager.io/v1
kind: Issuer
metadata:
name: letsencrypt-prod
spec:
acme:
# The ACME server URL
server: https://acme-v02.api.letsencrypt.org/directory
# Email address used for ACME registration
email: [email protected]
# Name of a secret used to store the ACME account private key
privateKeySecretRef:
name: letsencrypt-prod
# Enable the HTTP-01 challenge provider
solvers:
- http01:
ingress:
class: nginxLet’s check the status of our issuers.
kubectl describe issuer letsencrypt-staging
Name:         letsencrypt-staging
Namespace:    default
Labels:       <none>
Annotations:  kubectl.kubernetes.io/last-applied-configuration={"apiVersion":"cert-manager.io/v1","kind":"Issuer","metadata":{"annotations":{},"name":"letsencrypt-staging","namespace":"default"},(...)}
API Version:  cert-manager.io/v1
Kind:         Issuer
Metadata:
  Cluster Name:
  Creation Timestamp:  2018-11-17T18:03:54Z
  Generation:          0
  Resource Version:    9092
  Self Link:           /apis/cert-manager.io/v1/namespaces/default/issuers/letsencrypt-staging
  UID:                 25b7ae77-ea93-11e8-82f8-42010a8a00b5
Spec:
  Acme:
    Email:  [email protected]
    Private Key Secret Ref:
      Key:
      Name:  letsencrypt-staging
    Server:  https://acme-staging-v02.api.letsencrypt.org/directory
    Solvers:
      Http 01:
        Ingress:
          Class:  nginx
Status:
  Acme:
    Uri:  https://acme-staging-v02.api.letsencrypt.org/acme/acct/7374163
  Conditions:
    Last Transition Time:  2018-11-17T18:04:00Z
    Message:               The ACME account was registered with the ACME server
    Reason:                ACMEAccountRegistered
    Status:                True
    Type:                  Ready
Events:                    <none>
Define a Kubernetes Ingress with automatic TLS enabled
This is this last step where the fun starts. We will be defining a Kubernetes Ingress pointing to our domain while instructing cert-manager to handle all the TLS voodoo to register our certificate and expose it automatically for our application. This is not all, cert-manager will also take care of renewing the certificate before it’s expiration date. Oh yeah!
kubectl create --edit -f https://cert-manager.io/docs/tutorials/acme/example/ingress-tls.yamlapiVersion: extensions/v1beta1
kind: Ingress
metadata:
name: kuard
annotations:
kubernetes.io/ingress.class: "nginx"
# Remember our pro-tip. We test stuff against the staging issuer. Always!!!
cert-manager.io/issuer: "letsencrypt-staging"
spec:
tls:
- hosts:
# Set this to your target domain
- example.example.com
# You can use any name you prefer. Do not have multiple ingresses use the same one though.
secretName: quickstart-example-tls
rules:
- host: example.example.com
http:
paths:
- path: /
backend:
serviceName: kuard
servicePort: 80That’s all! Wait for the magic to happen! We can track the certificate registration process by inspecting the certificate resource.
kubectl describe certificate quickstart-example-tls
Name:         quickstart-example-tls
Namespace:    default
Labels:       <none>
Annotations:  <none>
API Version:  cert-manager.io/v1
Kind:         Certificate
Metadata:
  Cluster Name:
  Creation Timestamp:  2018-11-17T17:58:37Z
  Generation:          0
  Owner References:
    API Version:           extensions/v1beta1
    Block Owner Deletion:  true
    Controller:            true
    Kind:                  Ingress
    Name:                  kuard
    UID:                   a3e9f935-ea87-11e8-82f8-42010a8a00b5
  Resource Version:        9295
  Self Link:               /apis/cert-manager.io/v1/namespaces/default/certificates/quickstart-example-tls
  UID:                     68d43400-ea92-11e8-82f8-42010a8a00b5
Spec:
  Dns Names:
    www.example.com
  Issuer Ref:
    Kind:       Issuer
    Name:       letsencrypt-staging
  Secret Name:  quickstart-example-tls
Status:
  Acme:
    Order:
      URL:  https://acme-staging-v02.api.letsencrypt.org/acme/order/7374163/13665676
  Conditions:
    Last Transition Time:  2018-11-17T18:05:57Z
    Message:               Certificate issued successfully
    Reason:                CertIssued
    Status:                True
    Type:                  Ready
Events:
  Type     Reason          Age                From          Message
  ----     ------          ----               ----          -------
  Normal   CreateOrder     9m                 cert-manager  Created new ACME order, attempting validation...
  Normal   DomainVerified  8m                 cert-manager  Domain "www.example.com" verified with "http-01" validation
  Normal   IssueCert       8m                 cert-manager  Issuing certificate...
  Normal   CertObtained    7m                 cert-manager  Obtained certificate from ACME server
  Normal   CertIssued      7m                 cert-manager  Certificate issued Successfully
If the certificate was issued successfully, we’re good to switch to our production issuer.
kubectl create --edit -f https://cert-manager.io/docs/tutorials/acme/example/ingress-tls-final.yamlapiVersion: extensions/v1beta1
kind: Ingress
metadata:
name: kuard
annotations:
kubernetes.io/ingress.class: "nginx"
# We are switching to prod! Yay!
cert-manager.io/issuer: "letsencrypt-prod"
spec:
tls:
- hosts:
# Do not forget to define your domain
- example.example.com
secretName: quickstart-example-tls
rules:
- host: example.example.com
http:
paths:
- path: /
backend:
serviceName: kuard
servicePort: 80Since we had already quickstart-example-tls secret created we must delete it so that cert-manager replaces it with a new one.
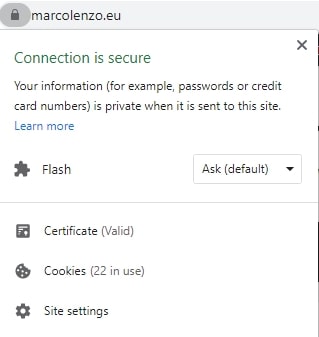
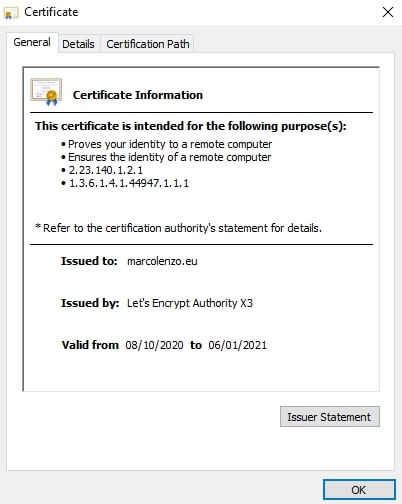
kubectl delete secret quickstart-example-tlsDone! Just access your website and be proud of yourself 🙂
Conclusion
Long gone are the times where obtaining a TLS certificate is pricey and cumbersome. Setup cert-manager in your Kubernetes cluster once and enjoy free automated TLS certificate registration and management. Use your spare time for your hobbies!
Feel free to comment if you need help with something!