
Reduce the size of Docker images with few steps

One of the advantages of using Docker images is that they are portable. However, portability is directly related to the size. A mobile phone wouldn’t be really “mobile” if it weighed 10 Kg. The same applies to Docker images. We want our containers to be as slim as possible. In this tutorial, I show you two simple techniques to reduce the size of your Docker images. In few steps, we will be able to turn a 1GB image into just 8 MB.
Reduce the number and size of layers
Docker images are like a layered cake. Each instruction you provide in the Dockerfile is creating a new layer. The key to keep our images slim is to reduce the number and size of layers.
We are going to use two techniques to achieve this:
- Multi-stage builds with lightweight or distroless base layers
- Layer merging and optimization with dive
The multi-stage build
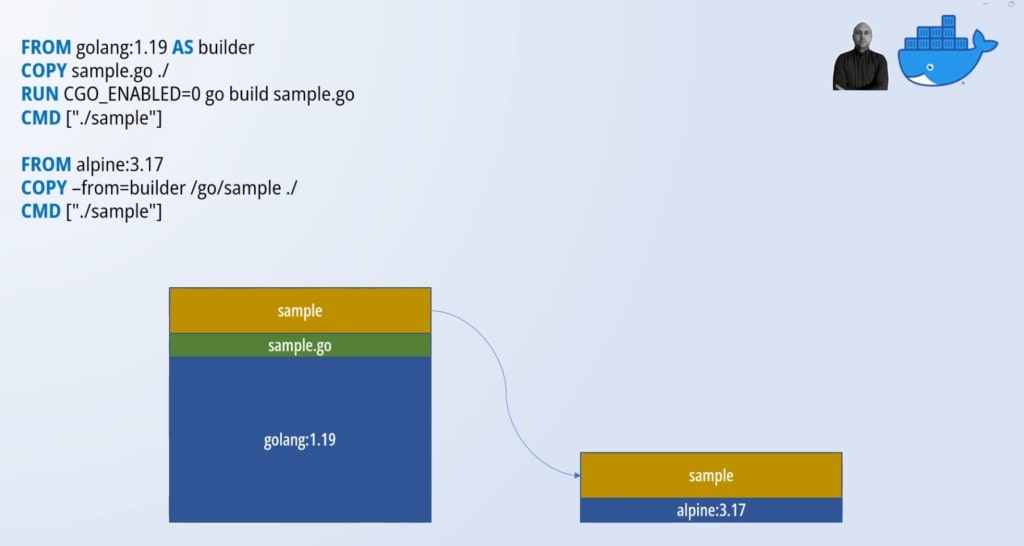
In a multi-stage build, we use multiple FROM instructions in the same Dockerfile. Each FROM instruction is creating a stage that can be given a name using the AS keyword. In our example, we are naming the first stage builder.
If we consider Docker images like layered cakes, the multi-stage build technique allow us to define multiple cakes. The final cake is defined with the last stage, i.e. the last FROM instruction. The cool bit is that we can borrow layers created in previous stages and add them to our image using the --from=<stage name> flag with the COPY instruction. This way we can use heavyweight images to perform the compilation, packaging and testing, while we switch to lightweight images for the final image including our runtime.
If you want a lightweight distro, I suggest Alpine which is also very secure. You can also go a step further and adopt a distroless base image. In a distroless image you find just the necessary to launch your application at runtime. Anything you typically find in a distro is not present such as package managers or shell. This approach is used by the big players in the market because apart from slimming our images it improves security by favouring immutability of our deployables.
Let’s compare four Dockerfiles and their difference in size.
You can find the files in my GitHub repository as well https://github.com/marcolenzo/containers-diet
# Dockerfile.original (sample-1-golang)
FROM golang:1.19
COPY sample.go ./
RUN CGO_ENABLED=0 go build sample.go
CMD ["./sample"]
# Dockerfile.multistage.debian (sample-1-golang)
FROM golang:1.19 AS builder
COPY sample.go ./
RUN CGO_ENABLED=0 go build sample.go
#CMD ["./sample"]
FROM debian:11-slim
COPY --from=builder /go/sample ./
CMD ["./sample"]# Dockerfile.multistage.alpine (sample-1-golang)
FROM golang:1.19 AS builder
COPY sample.go ./
RUN CGO_ENABLED=0 go build sample.go
FROM alpine:3.17
COPY --from=builder /go/sample ./
CMD ["./sample"]# Dockerfile.multistage.distroless (sample-1-golang)
FROM golang:1.19 AS builder
COPY sample.go ./
RUN CGO_ENABLED=0 go build sample.go
FROM gcr.io/distroless/static-debian11
COPY --from=builder /go/sample ./
CMD ["./sample"]Apart the Dockerfile.original which is a single stage build, all the rest a multi-stages with different base layers. Let’s build them and compare their sizes.
cd sample-1-golang
docker build -t sample-original -f Dockerfile.original .
docker build -t sample-debian -f Dockerfile.multistage.debian .
docker build -t sample-alpine -f Dockerfile.multistage.alpine .
docker build -t sample-distroless -f Dockerfile.multistage.distroless .
As you can see the distroless image is the winner! Keep in mind though you will not have any ability to interact with it once it’s deployed.

Merging layers with dive
Another very important thing to keep in mind is reducing the number of layers. Every time we add a layer we are increasing the size of our image. Sometimes it might be increasing way more than we imagine.
Let’s compare two files.
# Dockerfile.original (sample-3-layers)
FROM alpine:3.17
RUN apk update && apk add curl git
RUN curl -LO https://storage.googleapis.com/kubernetes-release/release/v1.26.0/bin/linux/amd64/kubectl
RUN chmod u+x kubectl && mv kubectl /bin/kubectl
# Dockerfile.optimized (sample-3-layers)
FROM alpine:3.17
RUN apk add --no-cache curl git \
&& curl -LO https://storage.googleapis.com/kubernetes-release/release/v1.26.0/bin/linux/amd64/kubectl \
&& chmod u+x kubectl && mv kubectl /bin/kubectlBoth images are doing the very same thing: installing curl and git, and downloading and moving kubectl to the bin folder. In the original example we create four layers, while in the optimized example we do it in just 2 layers. How much do expect them to be different in size?
cd sample-3-layers
docker build -t layers-original -f Dockerfile.original .
docker build -t layers-optimized -f Dockerfile.optimized .
There is a massive difference when we combine everything in two layers. But why?
To understand what happened, let’s use a tool named dive. You can find it and follow the installation instructions at https://github.com/wagoodman/dive
Once installed, let’s run the command dive layers-original
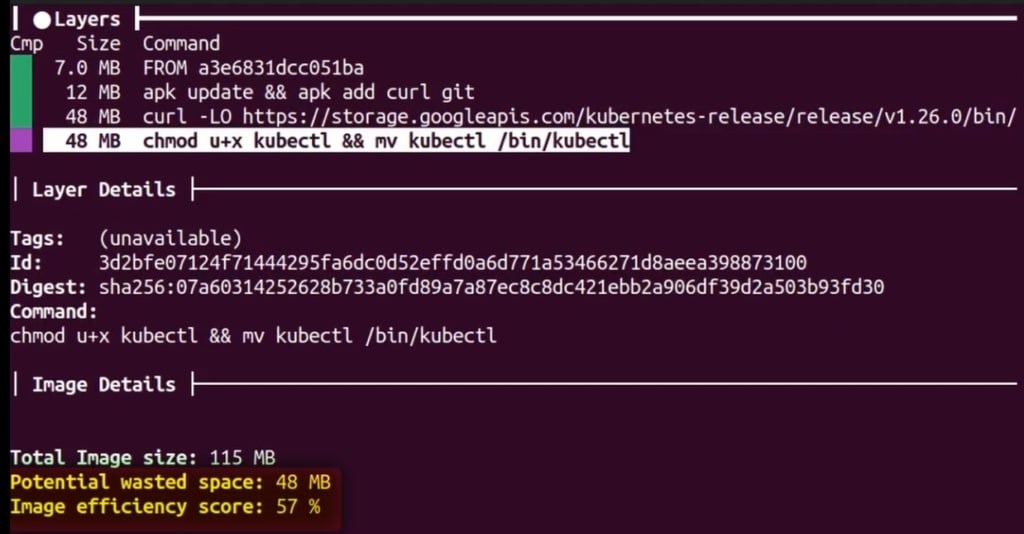
We can see the poor efficiency of the multiple layers. Moving kubectl is actually costing us the size of the executable two times. The tools highlights that and warns us we are potentially wasting 48MB.
We now check the other image with dive layers-optimized
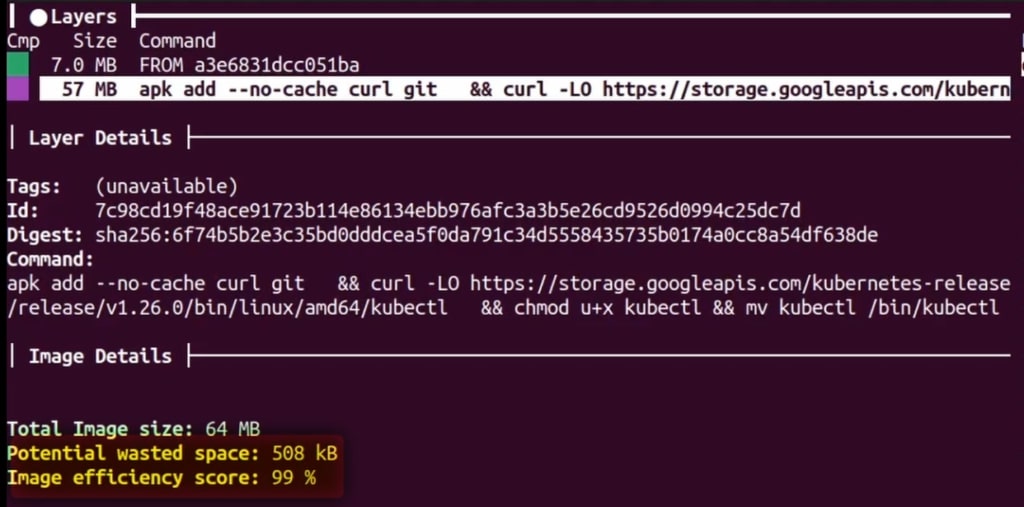
Much better! We got rid of the wasted 48MB by combining the layers. We actually have the potential to shave 508KB more. I leave that optimization to you!
Conclusion
In this tutorial we learnt how to reduce the size of our Docker images and keep it in check. As you can see, it is pretty simple with multi-stage builds and layer merging. Tools like dive can helps us spot potential waste and guide our optimization process.
See you next time!